



Why winging it on complex reroofs quietly eats your margin
Most residential reroofs don't need a formal site plan. A single-story ranch with a driveway drop and a dumpster spot? The foreman eyeballs it, crew gets to work, done. But once you're into complex jobs — steep multi-level homes, tight lots, tile that needs a boom lift, crane sets for skylights or heavy HVAC-adjacent tear-offs — that eyeball approach starts costing real hours and creating real safety exposure.
The pattern tends to be the same. Crew rolls up at 6:45, and the boom truck driver can't find a spot that clears the power drop. The dumpster's already sitting where the lift needs to plant its outriggers. A neighbor's blocking the only viable staging width because nobody told them anything. By the time it's sorted, you've burned 90 minutes of a crew you're paying by the hour and the whole day's schedule has slid.
This post is narrow on purpose. It's about one thing: building a roofing site layout rigging plan you can produce in about 15 minutes, print on one page, and attach to the permit file so your foreman, crane operator, and inspector are all looking at the same picture before anyone climbs a ladder.
The three failure points that actually cause the downtime
Before getting into the template, it's worth being precise about where the day goes sideways. It's almost never a mystery on-site — it's a decision that didn't get made in the office.
Staging conflicts. The dumpster, material drop, tear-off pile, and equipment footprint all compete for the same 30–40 feet of usable ground. On a tight suburban lot, you might have one shot at where the boom truck sets. If the dumpster's already in that spot, someone's re-spotting a container mid-morning — which usually means a second delivery fee and a driver who's now behind on his other stops.
Lift and crane placement. This is where a scheduling problem becomes a safety problem. Overhead power lines, soft ground near a septic field, a setup that puts the boom's swing radius over the neighbor's roof — these get "discovered" on-site because nobody mapped clearances ahead of time. The operator ends up making a judgment call under time pressure, which is exactly the condition you don't want around a crane.
Neighbors. People underestimate how much a surprised neighbor can cost. A blocked shared driveway, a complaint call to the city about a lift near a property line, a homeowner next door who didn't know and won't move their car — any of these can stall a setup by an hour easily.
What the one-page plan actually needs on it
The goal is not a pretty CAD drawing. The goal is a single sheet a foreman can hold, a crane operator can sanity-check, and an inspector can glance at and nod. If it takes more than one page, it won't get used in the field.
Keep every roofing job on track and on time.
Roofyly helps you manage, schedule, and communicate every roofing project with precision and ease.
- Centralized project planning
- Real-time crew notifications
- Integrated scheduling & client updates
No credit card required
Here's what actually earns its place on that sheet:
-
A rough site diagram — property outline, house footprint, driveway, street. Hand-sketched over a satellite screenshot is completely fine.
-
Staging zones marked — material drop, dumpster/debris, ground crew work area, and equipment footprint, each labeled so there's no overlap ambiguity.
-
Lift/crane setup point with outrigger footprint and swing radius drawn in.
-
Overhead and underground hazards — power lines with a clearance note, gas meter, septic/leach field, irrigation.
-
Access and egress — where trucks pull in, where they turn around, where the walkout path for an injured worker would be.
-
Neighbor-impact notes — shared driveways, fence lines the swing radius crosses, cars that need to move.
-
One clearance table (below) filled in for the specific job.
That's it. One page, front side only. If it starts getting complicated, something's gone wrong in the planning stage, not the drawing stage.
Lift and crane placement rules worth writing down
The reason placement rules belong on paper rather than in the operator's head is that the operator changes. Your regular guy is out, the rental company sends someone new, and suddenly the tribal knowledge walks off the job. A short clearance table removes the guesswork.
| Hazard / Factor | Minimum rule of thumb | Who confirms it | Note on the plan |
|---|---|---|---|
| Overhead power (under 50kV) | 10 ft minimum clearance, more if energized voltage unknown | Foreman + operator | Mark line location + height estimate |
| Ground bearing near septic/soft soil | No outrigger set within field edge; use pads | Foreman | Flag field boundary on diagram |
| Swing radius over neighbor property | Avoid, or get written OK before job day | Office / sales rep | Note neighbor consent status |
| Setup distance from structure | Confirm boom reach covers ridge at planned spot | Estimator | Note reach vs. required distance |
| Pedestrian / traffic in swing zone | Cone off; assign spotter | Foreman | Mark spotter position |
Treat these as your defaults and adjust to your equipment and local code. The value is that they're written, consistent, and confirmed by a named person before the truck rolls — not improvised at 7am.
One thing that keeps showing up on complex jobs: the setup point gets chosen for convenience (closest flat spot) rather than for reach and clearance. Then the boom can't quite make the far ridge, and you're either re-spotting or hand-carrying material the lift was supposed to handle. Ninety seconds of checking reach-versus-distance in the office prevents that entirely.
Neighbor-notice scripts that actually get a response
Notices fail when they're vague. "Roof work will occur soon" gets ignored. What works is specific, short, and gives the neighbor one clear action. Two versions worth keeping in a doc and adapting per job:
Door-hanger / text version (2–3 days out):
> "Hi — [Company] is reroofing [address] on [date], starting around 7am. We'll have a lift/crane set up and may need brief access near the property line. Could you keep [driveway/street spot] clear that morning? Any concerns, call/text [foreman name + number]. Thanks for your patience — we'll be cleaned up by [time]."
Swing-radius / shared-driveway version (needs consent):
> "Hi — the equipment for [address]'s roof will briefly swing over the area near your [fence/driveway] on [date]. Nothing lands on your property and a spotter is present the whole time. We'd like your OK before we proceed — mind a quick text back confirming? Happy to walk it with you beforehand."
The second one matters because it creates a record. If a neighbor consents by text and then complains, you have the thread. And if they don't consent, you've found out in the office instead of with a crane rigged and a crew standing around.
A 15-minute build process for the plan
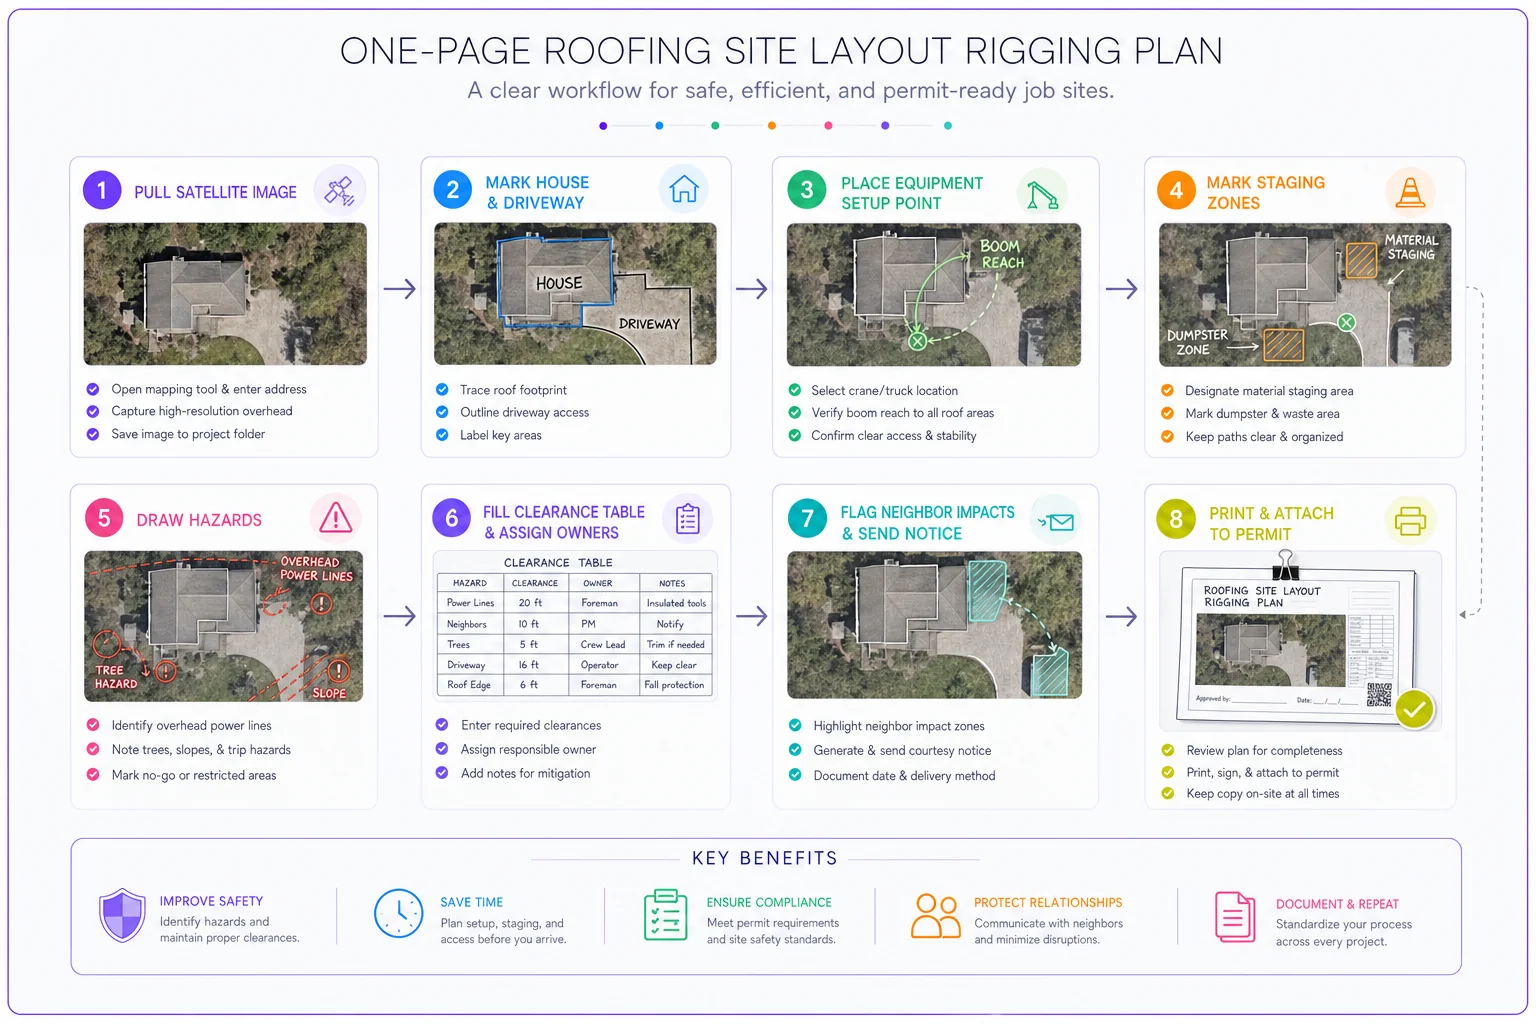
This is the part that makes it stick. If building the plan feels like a project, it won't happen consistently. Keep it to a tight sequence the estimator or ops coordinator runs after the job's booked:
-
Pull a satellite image of the property and screenshot it. Mark the house, driveway, street.
-
Drop the equipment setup point based on boom reach to the farthest ridge — check reach before anything else.
-
Place staging zones so the dumpster and material drop don't sit in the equipment footprint or block access.
-
Draw hazards — power lines, gas, septic, fences the swing crosses.
-
Fill the clearance table for this specific job and assign the confirming person to each row.
-
Flag neighbor impacts and send the right notice script 2–3 days out.
-
Print one page, attach to the permit file, and send a copy to the foreman the night before.
Steps 5 and 6 both need named owners. A plan without a named person on each check is just a drawing. Nobody owns a drawing.
Here's a quick visual of the build steps.
Steps 5 and 6 both need named owners. A plan without a named person on each check is just a drawing. Nobody owns a drawing.
Where this fits into the rest of your job-day system
The site plan doesn't live in isolation. The same setup decisions ripple into your routing and permit workflow. If your equipment needs a specific delivery window, that has to line up with how you're sequencing the day — the same buffer logic covered in rule-based multi-stop routing for residential roofing crews applies here, since a re-spotted dumpster or delayed boom truck can blow up more than one job on the schedule.
Inspectors increasingly want to see that access, staging, and equipment were planned rather than improvised. The one-page diagram fits naturally into the same permit file discipline covered in the jurisdictional intake and inspector-cadence playbook. A clean, attached site plan is one less thing an inspector has to ask about on a walkthrough — and that matters when you're trying to keep a tight schedule on a multi-day job.
A real scenario: tile reroof on a tight hillside lot
A mid-size residential crew took on a tile reroof on a narrow hillside street — single access point, power lines running along the front, neighbor's carport within the boom's swing arc. Their normal process worked fine for bread-and-butter asphalt jobs, so nobody built a formal layout for this one.
Job day: the boom truck couldn't set at the obvious spot because of the power drop. The only viable alternative put the swing over the neighbor's carport. Neighbor was home, wasn't happy. Setup didn't wrap until close to 9:30. With a six-person crew plus the rented boom sitting idle, the lost morning ran somewhere around $900–$1,200 between idle labor and the extra rental hour — on a job that was already tight on margin.
They rebuilt the process after that. Nothing fancy — a satellite screenshot, the clearance table, and a texted neighbor notice two days ahead. On the next comparable tile job, the boom was set and the crew was tearing off by about 7:20. Same crew, same equipment, roughly a two-hour swing in the right direction. The plan took about 15 minutes to build.
When this is worth it — and when it's overkill
Build the plan when:
-
the job needs a boom or crane
-
the lot is tight or sloped
-
there are overhead lines
-
a swing radius crosses a property line
-
access is single-point. Basically any job where re-spotting equipment or a neighbor conflict is genuinely plausible.
Skip the formal plan when:
-
it's a straightforward single-story with open access
-
a ground-level material drop
-
no lift. Forcing a template onto simple jobs trains your crew to ignore it.
The plan should signal "this one's different, pay attention" — and it only carries that signal if you don't overuse it.
One more thing worth saying: if your foreman is genuinely holding all of this in his head and documenting it for inspectors and whoever fills in next — fine. But that knowledge isn't transferable. The day he's out sick, so is your margin protection on complex jobs. Writing it down isn't about distrust; a one-page sheet just survives a sick day in a way that one guy's memory doesn't.
Bringing it together
Job-day downtime on complex reroofs isn't bad luck. It's a set of decisions — where the lift sets, where the dumpster goes, whether the neighbor knew — that either got made in the office with 15 quiet minutes, or got made on-site with a crew on the clock and a crane half-rigged. The one-page roofing site layout rigging plan just moves those decisions to the cheaper, safer place to make them.
Start with your next tile or steep multi-level job. Screenshot the lot, mark the setup point off boom reach, fill the clearance table, send one neighbor text. Attach the page to the permit file. It won't feel like much the first time — right up until the morning it saves you two hours and an argument in someone's driveway.
Start with your next tile or steep multi-level job. Screenshot the lot, mark the setup point off boom reach, fill the clearance table, send one neighbor text. Attach the page to the permit file. It won't feel like much the first time — right up until the morning it saves you two hours and an argument in someone's driveway.
Ready to elevate your roofing operations?
Join hundreds of roofing contractors using Roofyly to streamline workflows, improve crew coordination, and enhance client satisfaction.