

Ventilation is the part of a reroof that almost nobody looks at after the shingles go down. The crew nails off the ridge, the site gets cleaned, the homeowner signs, and everyone moves on. Then eight months later you get a call about condensation dripping onto insulation, or a warranty inspector from the manufacturer points at a ridge vent installed over a slot that was never cut wide enough — or never cut at all.
That's the frustrating part about attic ventilation problems. They're invisible on install day, they don't show up in your closeout photos unless you specifically went looking, and by the time they surface, the warranty conversation has already turned into a "prove you did it right" fight you're going to lose without documentation.
This is a walkthrough of a compact 6-point attic and vent check you can run at the end of every install, the specific photos you need to make it defensible, and how to fold homeowner sign-off on ventilation into your final acceptance so it actually closes the warranty loop instead of leaving it open.
Why ventilation is the weak link in most closeouts
Most crews treat ventilation as a materials decision made during the estimate — pick a ridge vent, add some soffit intake, done. The problem is that the estimate assumes things about the attic that nobody verified after tear-off. The intake gets blocked by insulation. The ridge slot gets undercut because the sawyer was moving fast. A bathroom fan vents straight into the attic instead of out the roof. None of that is visible from the ground, and none of it shows up in a standard final-walkthrough packet.
The ventilation defects that actually generate callbacks aren't exotic. They're the same handful of misses, over and over:
-
Net free area of intake and exhaust that don't balance, so the whole system chokes
-
Ridge vent installed over an unslotted or barely-slotted deck
-
Existing gable vents left open after a ridge vent went on, short-circuiting airflow
-
Bath and kitchen exhaust dumping moisture into the attic
-
Baffles missing at the eaves, so blown insulation smothers the soffit intake
The reason these slip through is structural, not lazy. Your final walkthrough is built for what the homeowner can see — clean gutters, no debris, straight lines, no exposed nails. Ventilation lives in the attic and under the ridge, and unless someone made a deliberate step to check it, it doesn't get inspected.
The 6-point attic/vent check
Keep this short enough that a foreman will actually run it. Six points, each with a required photo, each with a pass/fail. If it takes more than ten minutes, it won't survive a busy Friday.
Keep every roofing job on track and on time.
Roofyly helps you manage, schedule, and communicate every roofing project with precision and ease.
- Centralized project planning
- Real-time crew notifications
- Integrated scheduling & client updates
No credit card required
Carry a laminated checklist and take photos in sequence to speed the walkthrough.
1. Ridge/exhaust cut verification. Before the ridge vent goes on — or immediately after if you're retrofitting the check — confirm the deck slot is cut to spec (typically the manufacturer's called width, often around 1.5"–2" total, minus the ridge board). Photo of the open slot with a tape measure in frame. This is the single most-missed item and the one that voids the most warranties.
2. Intake at the eaves. Walk the attic, look at every soffit bay for the run of the roof. Confirm intake is open and not packed with insulation. Photo showing daylight or open intake at a representative eave, plus a baffle where insulation is present.
3. Intake/exhaust balance. Do the net free area math on-site. Total exhaust NFA should not exceed intake NFA — if intake is short, you get negative pressure pulling conditioned air up, and the system underperforms. Note the numbers on the check sheet. A quick photo of your calc or the vent product labels counts as evidence.
4. No competing exhaust. If you installed a ridge vent, gable vents and old box vents need to be closed off or you've built a short circuit. Photo of any old vents and their disposition (sealed, removed, left intentionally with reasoning noted).
5. Appliance venting. Confirm bath fans, kitchen exhaust, and dryer vents terminate through the roof or wall — not into the attic. This is the moisture time-bomb. Photo of each termination.
6. Baffle and insulation clearance. At the eaves, confirm baffles are installed and insulation isn't blocking airflow into the attic. Photo of a baffle in place.
Each point is a simple pass/fail. Any fail stops the sign-off until it's corrected or documented as a homeowner-declined item.
The photo standard that makes it defensible
A photo of "the attic" proves nothing eight months later. What makes ventilation photos hold up in a warranty dispute is context in the frame and a naming convention that ties the shot to the job and the checkpoint.
| Check point | Required photo | Must be visible in frame | Common miss |
|---|---|---|---|
| Ridge cut | Open slot, pre-vent | Tape measure reading width | No tape, so width is unprovable |
| Eave intake | Soffit bay from attic | Open channel / daylight | Insulation already blocking |
| Balance | Vent labels or calc sheet | NFA numbers | No math done at all |
| Competing exhaust | Old gable/box vents | Sealed or removed state | Left open, short-circuit |
| Appliance vents | Each termination | Exit through roof/wall | Fan dumping into attic |
| Baffles | Eave baffle in place | Clearance above insulation | No baffle, smothered intake |
The naming matters as much as the shot. If you already run a shot-list and tagging discipline for the rest of the job, extend it here — [job#]-VENT-01-ridgecut, -VENT-02-intake, and so on. When a warranty question comes in a year later, you want to pull the ventilation set in ten seconds, not scroll through 200 unlabeled attic photos.
Tying the check to acceptance and warranty closure
The part most crews skip: the ventilation check has to be a gate on final acceptance, not a separate side document that lives in a folder nobody opens.
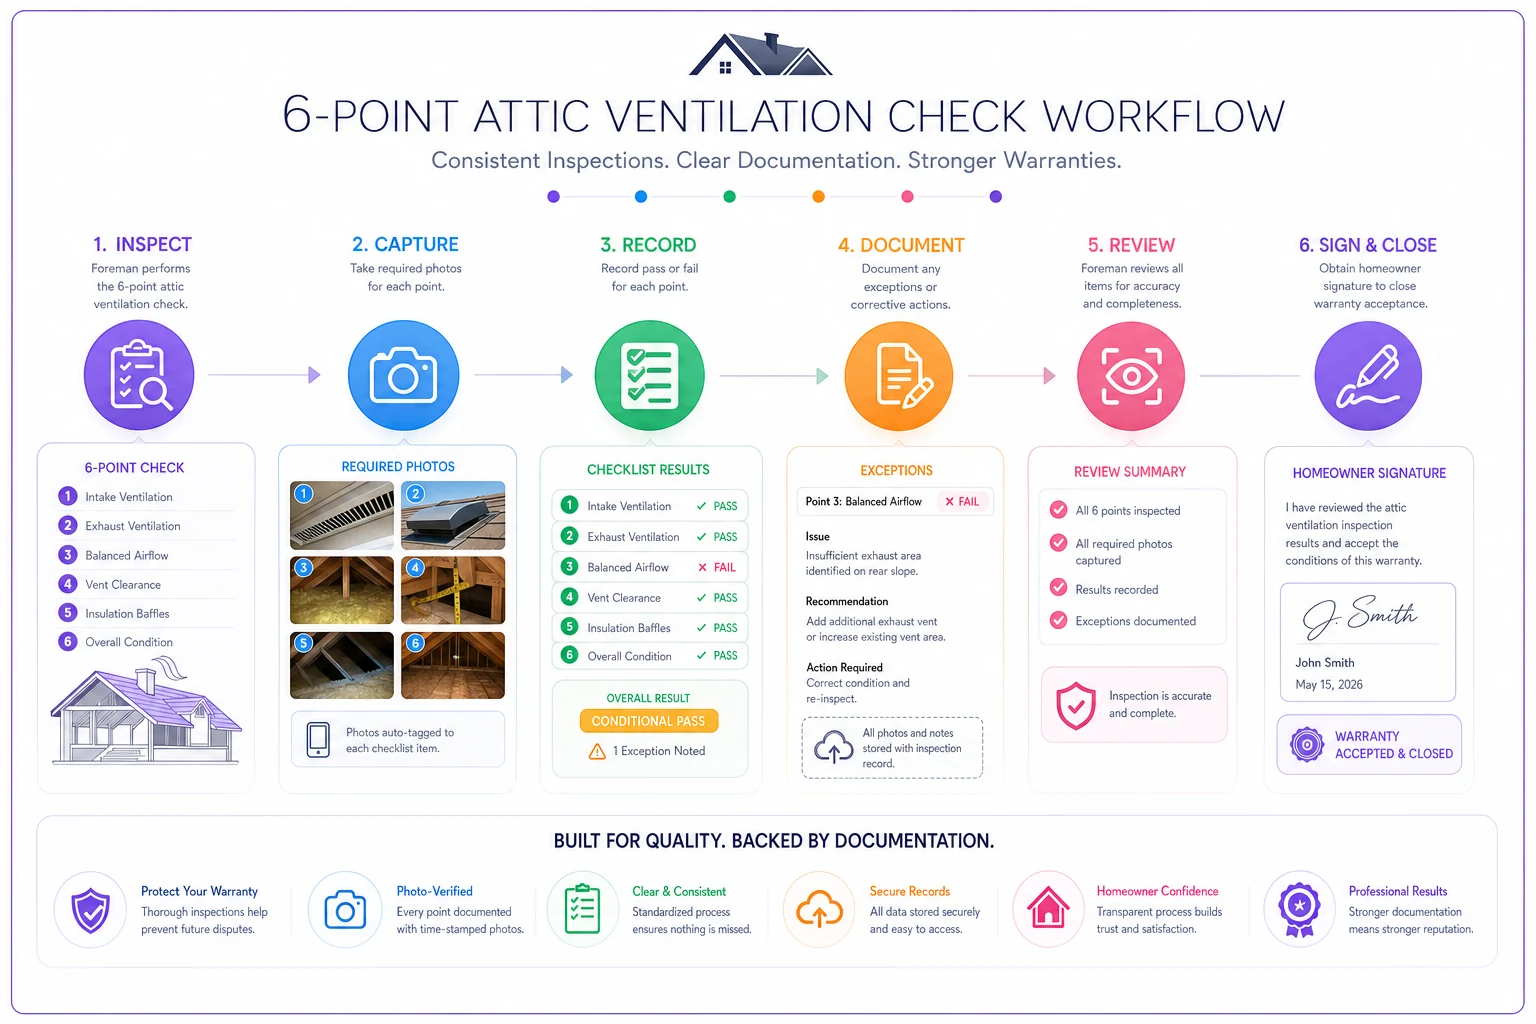
In practice, the foreman runs the 6-point check and collects the photos. Any fail either gets corrected on the spot or gets written up as a documented exception. Then the ventilation results become a line item on the homeowner walkthrough sheet, right alongside the visible-quality items. The homeowner initials that the ventilation check was completed and reviewed, the same way they sign off on the rest of the job.
That initial does two things. It confirms you disclosed the ventilation condition, and it starts the clock on warranty terms tied to acceptance. If you're already mapping acceptance gates across the job, this slots in cleanly — the same logic behind a proper final-walkthrough QA checklist and closeout packet applies here. Ventilation just needs its own explicit gate instead of being lumped into "looks good."
For the warranty side, the ventilation photo set and the signed check become part of the closeout record that closes the loop. If your permit-to-warranty lifecycle already has acceptance and closeout stages defined, the ventilation check is the artifact that lets you actually stand behind the manufacturer warranty — because most manufacturer warranties are conditional on adequate ventilation, and you now have proof it existed on install day.
Below is a simple workflow for tying the ventilation check to final acceptance.
The homeowner sign-off language
> "Attic ventilation was inspected on completion. Intake, exhaust, and appliance venting were verified against manufacturer requirements. Any noted exceptions are listed below and were reviewed with the homeowner."
Then a two-line space for exceptions and the homeowner's initials. That's it. You're not asking them to understand net free area — you're documenting that the check happened and that they saw the results.
A real scenario
A mid-size residential crew running around 8–10 reroofs a week kept getting a specific callback: condensation and staining showing up in attics three to six months post-install, mostly on jobs done in the shoulder seasons. Two of them turned into manufacturer warranty disputes where the crew couldn't prove the ridge was slotted correctly, and they ate the repairs — roughly $1,800 and $2,600 respectively, plus the reputational hit and a chunk of a foreman's week.
They added the 6-point check as a hard gate on the walkthrough. Nothing fancy — a laminated card, six phone photos, and a line on the homeowner sheet. Over the next season the pattern they found was almost predictable: on roughly one in five jobs, the bath fan was venting into the attic, and on a handful the ridge slot was undercut. All of it caught and fixed on install day, when a fix takes twenty minutes instead of a return trip and a drywall repair.
Ventilation callbacks didn't drop to zero, but they went from a recurring monthly headache to something that came up maybe once or twice the rest of the year — and both of those they closed fast because the photo set proved the install was correct and the problem was elsewhere. The exception documentation on a couple of homeowner-declined upgrades also killed two disputes before they started.
When this makes sense — and when it's overkill
This full 6-point check earns its keep on any job with an attic and a manufacturer warranty in play, especially retrofits where you're inheriting somebody else's ventilation mess. Older homes with gable vents, blown-in insulation, and mystery appliance venting are exactly where the misses hide.
Where it's overkill: low-slope commercial without a traditional attic, or a simple vent-to-vent replacement where nothing about the airflow system changed and you can document that. In those cases a trimmed version — ridge cut and appliance venting only — makes more sense than running the full six.
Who should not treat this as optional: any crew installing under a manufacturer's enhanced or system warranty. Those warranties almost always require adequate ventilation, and "we always ventilate correctly" is not a defense. The photo of the tape on the ridge slot is.
Where the friction usually is
The reason ventilation checks don't stick isn't that crews disagree with them — it's that adding a step to a Friday afternoon walkthrough is where good intentions go to die. The check has to be fast, the photos have to auto-tag to the job, and the homeowner sign-off has to be part of the same form they're already signing, not a second piece of paper.
When the six checkpoints, the required photos, and the homeowner initials live inside the same walkthrough record — where a fail actually blocks acceptance and the photo set files itself against the warranty record — the discipline holds. This is where operational software that gates job acceptance on completed checks does the enforcing for you, instead of relying on a foreman to remember on the busiest day of the week. When the ventilation evidence is just part of how a job closes, you stop having the "did we check the vents?" conversation entirely.
The whole point is to move ventilation from an invisible assumption to a documented, homeowner-acknowledged, photo-backed step in your closeout. Six points, six photos, one signature. Small addition to the walkthrough, and it turns the one part of the roof nobody looks at into the part of your warranty defense you never have to worry about.
Ready to elevate your roofing operations?
Join hundreds of roofing contractors using Roofyly to streamline workflows, improve crew coordination, and enhance client satisfaction.