


The gap between "the roof is done right" and "the roof passes inspection" is bigger than most crews realize. You can nail every course, ice-and-water the valleys perfectly, and still eat a failed inspection because the inspector couldn't find the decking fastener schedule, the material labels got tossed with the wrapper, or nobody photographed the underlayment before the shingles went on.
A reroof inspection fails for two reasons: the work was actually wrong, or the work was fine but undocumented and hard to verify. The second category is almost entirely avoidable, and it's where most contractors bleed re-inspection fees, rescheduling delays, and foreman time standing on a roof waiting for someone to drive back out.
This is about building one tight, inspector-focused packet and a foreman-facing pre-check that's keyed to the specific ways municipal inspections go sideways — not a generic "be prepared" lecture.
Why "the work is good" isn't enough at the curb
Inspectors aren't re-roofing the house in their head. They're verifying a short list of code-sensitive items against what they can see and what you hand them. When those two things don't line up fast, the default answer is "fail" or "I'll need to come back."
A common example: a crew finishes a tear-off and reroof on a 28-square hip roof, everything correct. The inspector shows up, asks for the drip edge detail at the eave, and it's already covered by starter and shingles. No photos. Now the inspector either takes your word for it — some will, most won't — or flags it for verification. That's a half-day gone, a re-inspection fee, and a homeowner texting "is something wrong with my roof?"
The failure wasn't workmanship. It was that concealed work couldn't be re-verified once it was buttoned up. Nail patterns, underlayment type, flashing laps, decking replacement — all of it disappears under the finished surface. If you didn't capture it mid-install, you can't produce it at inspection, and the inspector's job is to assume the worst when they can't see it.
The second big category is jurisdiction-specific interpretation. Two towns 15 miles apart will read the same code section differently — one wants two layers max before full tear-off, one wants ring-shank nails on re-decking, one requires a specific ventilation calculation on the permit. If your packet doesn't speak to that town's known hot buttons, you're gambling.
The one-page inspector packet: what actually goes on it
The goal is a packet an inspector can scan in 90 seconds and feel confident about. Not a binder. A tight, scannable set — most of it should fit on one printed page plus a photo appendix.
Keep every roofing job on track and on time.
Roofyly helps you manage, schedule, and communicate every roofing project with precision and ease.
- Centralized project planning
- Real-time crew notifications
- Integrated scheduling & client updates
No credit card required
-
Job header block — permit number, address, permit type (reroof/tear-off/overlay), scope in one line, number of squares, roof system (asphalt, metal, tile, etc.)
-
Jurisdiction-specific note line — the one or two things this town always checks. "City of ___ requires ring-shank fasteners on replaced decking" sits right at the top so the inspector sees you already know.
-
Material manifest — product names, manufacturer, and the code approval / product report numbers (ESR, Florida Product Approval, local equivalent) for the shingle, underlayment, drip edge, and ventilation components. This is the thing inspectors most often ask for and crews most often can't produce.
-
Concealed-work photo index — a numbered list pointing to the appendix photos: decking condition, re-decking areas, underlayment coverage, ice-and-water at eaves/valleys, drip edge laps, flashing, nail pattern.
-
Site layout sketch — a simple roof diagram marking elevations, penetrations, valleys, and any structural repairs done during tear-off, so the inspector can orient fast on a complex roof.
-
Ventilation summary — net free area required vs. provided, intake vs. exhaust, so the inspector doesn't have to do the math.
-
Sign-off line — foreman name, completion date, and who to call.
The photo appendix is where the real defensibility lives. If you've already built a shot-list discipline for claims and callbacks, this is a natural extension — the same photos that protect you with an insurer also prove concealed work to an inspector. The difference is ordering and labeling for the inspector's eye, not the adjuster's.
The material manifest problem nobody talks about
This pattern costs crews more than they realize: the material labels and product data are gone by inspection day.
The underlayment comes in a roll, the wrapper has the product name and sometimes the approval number, and that wrapper ends up in the dumpster at 10 a.m. The shingle bundle wrappers — same thing. When the inspector asks "what underlayment is this and is it approved?", the foreman is standing there with nothing.
The fix is dead simple and almost never done: photograph every material label before it's installed or thrown away, and record the product approval number once per job in the manifest. One photo of the shingle wrapper, one of the underlayment roll label, one of the drip edge box, one of the ventilation product. Thirty seconds total. It turns "trust me" into "here's the label and the approval number."
For jurisdictions with strict product-approval rules — coastal Florida, high-wind zones, certain California fire areas — this isn't optional. The inspector will fail you without it. For everyone else, it just makes the inspection faster and smoother, which means fewer callbacks to reschedule.
Common municipal failure modes — and the foreman check that catches each
A pre-inspection checklist is only useful if it's keyed to how inspections actually fail, not a generic "did you do the roof" list. Below is a breakdown of recurring failure modes and the specific thing the foreman should verify before calling for inspection.
| Failure mode | How it shows up | Foreman pre-check |
|---|---|---|
| Concealed work unverifiable | Inspector can't see underlayment, nail pattern, ice-and-water | Confirm numbered concealed-work photos exist and are in the packet |
| Missing product approvals | "What's this underlayment? Is it listed?" | Material label photos captured + approval numbers on manifest |
| Drip edge / flashing detail hidden | Eave and rake details covered before inspection | Photos of drip edge laps and flashing before cover; note on sketch |
| Ventilation shortfall | Net free area doesn't meet calc, or intake/exhaust imbalance | Ventilation summary filled, actual vents counted vs. required |
| Decking replacement undocumented | Inspector asks which sheets were replaced, fastener type | Mark re-decked areas on site sketch, photo fastener schedule |
| Second-layer / overlay rule | Town requires full tear-off over X layers | Confirm layer count photo at tear-off, note on header |
| Permit/scope mismatch | Field scope differs from what's on the permit | Compare permit scope line to actual work before calling inspection |
| Setback/access for inspector | Inspector can't safely access roof or key areas | Ladder access ready, debris cleared, roof walkable |
Keying the checklist to failure modes forces the foreman to think like the inspector. Instead of "is the roof done," the question becomes "can I prove the thing this inspector will ask about."
A clean pre-inspection sequence for the foreman
Run this before anyone calls the city — not the morning the inspector is scheduled. The timing matters. You want to catch gaps while the crew is still on site or reachable.
-
Pull the permit scope and read it out loud. Does the installed work match the permit's stated scope? If you added decking, changed ventilation, or found structural work during tear-off, flag whether that needs an update before inspection.
-
Walk the concealed-work photo index. Go line by line
decking, underlayment, ice-and-water, drip edge, flashing, nail pattern, re-decked areas. Any missing photo is a potential fail — if the work's already covered, you have a decision to make now, not at the curb.
-
Verify the material manifest. Every product listed with its approval number. Label photos present. If a label photo is missing and the material's already installed, pull the batch or product info from remaining packaging or delivery paperwork.
-
Check the jurisdiction note. What does this town always flag? Confirm you've addressed and documented it specifically.
-
Confirm ventilation math. Required net free area vs. provided, written on the summary. Count actual installed vents against the number.
-
Prep physical access. Ladder set, roof walkable, debris cleared, and the one-page packet printed and on site. A well-organized jobsite reads as a well-run job — the same thinking behind a one-page site layout and rigging plan applies here: an inspector who can move around easily inspects faster and more favorably.
-
Only then call for inspection.
The discipline is in steps 2 and 7. Most failed inspections trace back to calling before the concealed-work evidence was confirmed complete.
A simple workflow for the foreman to follow.
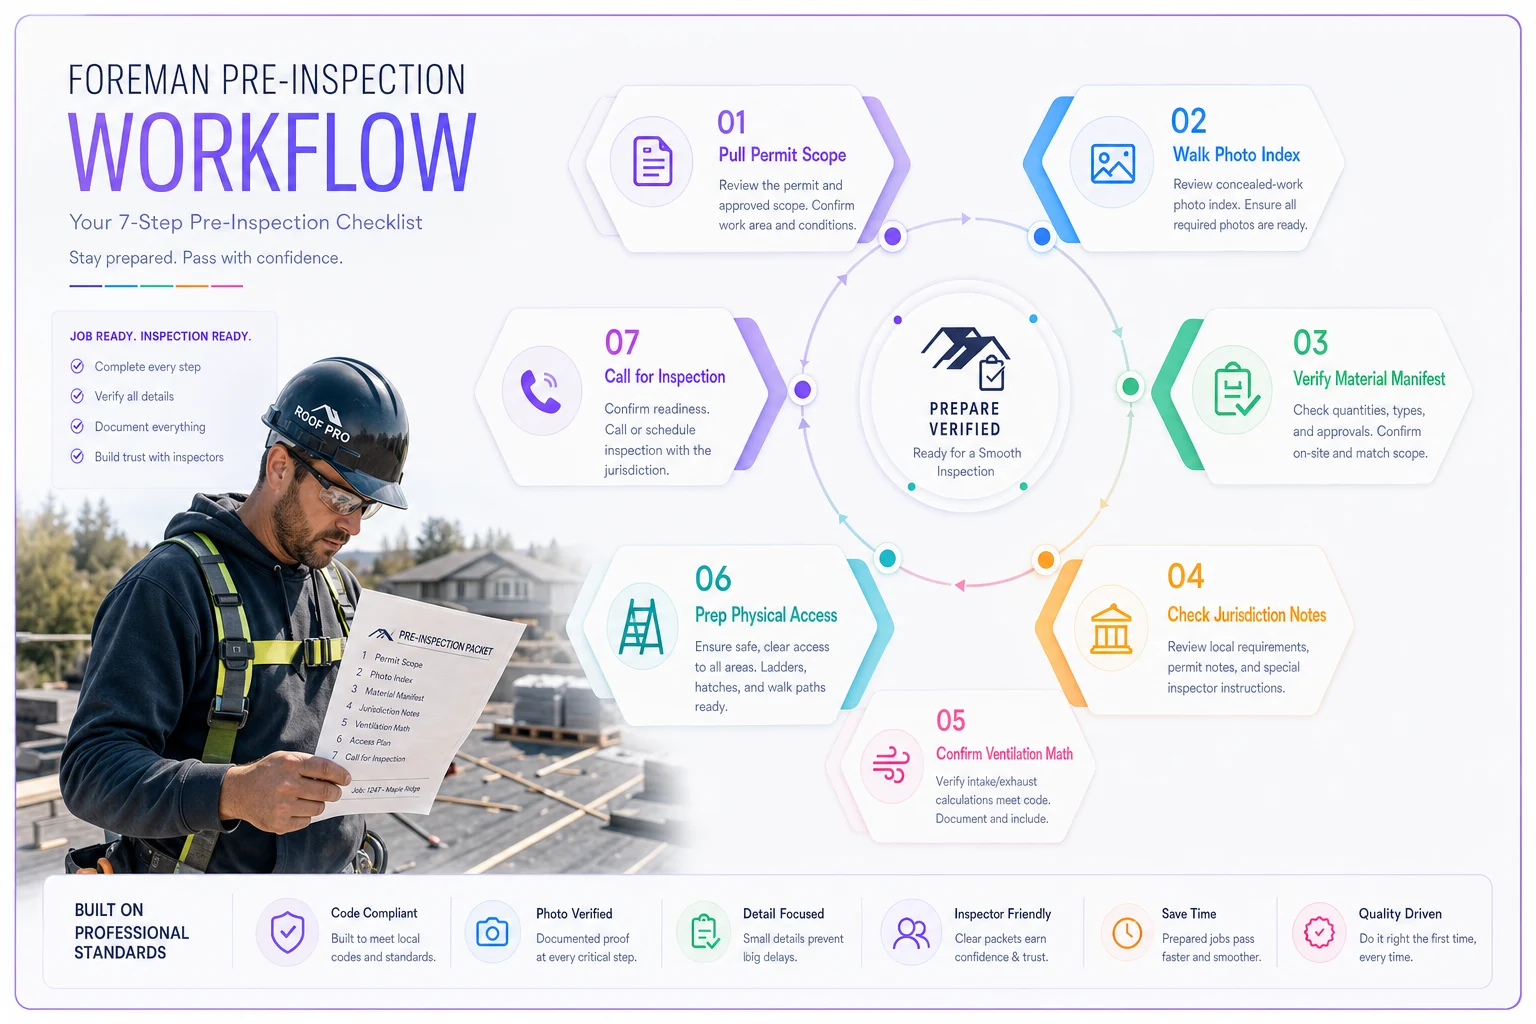
Use this workflow every time before you call the city to keep re-inspections from creeping back in.
Where jurisdictions quietly differ — and why your packet has to flex
The biggest unforced error is treating every town the same. A packet that clears clean in one municipality gets flagged next door because the second inspector reads the ventilation requirement differently, or wants the fastener schedule called out explicitly, or requires a mid-roof inspection you didn't even schedule.
Building a running record of each jurisdiction's quirks — who inspects, what they consistently check, their re-inspection fee, their scheduling cadence — turns a guessing game into a checklist item. If you've already worked through a jurisdictional intake checklist and inspector-cadence approach, the inspector packet is the downstream artifact that puts that intelligence to use. The intake tells you what the town cares about; the packet proves you handled it.
A practical move: keep a one-line "known pitfalls" note per jurisdiction and paste it onto the packet header for every job in that town. Over a season you build institutional memory that survives crew turnover, instead of relearning each inspector's preferences one failed inspection at a time.
A real scenario: the re-inspection tax
A mid-size residential roofing company running three crews was passing roughly 70% of inspections on the first try. The failures weren't workmanship — their QA on the actual roof was solid. The failures were documentation: missing product approvals, concealed work already covered, ventilation calcs the inspector had to request separately.
Each failed inspection cost them a re-inspection fee (somewhere in the $85–$150 range depending on the town), plus a half-day to full-day schedule slip, plus foreman time driving back to meet the inspector again. Across three crews they were eating somewhere around 8–12 re-inspections a month. Call it a few thousand dollars in fees and considerably more in lost crew hours and delayed closeouts.
They built the one-page packet and the failure-mode foreman checklist, made "packet complete" a hard gate before anyone called the city, and first-pass rates climbed into the low 90s within a couple months. The re-inspection fees mostly went away, but the bigger win was schedule predictability — jobs closed on time, final payments weren't held up waiting on a passed inspection, and foremen stopped burning afternoons on repeat visits.
Nothing about the actual roofing changed. The roofs were already good. What changed was that the roofs became easy to verify.
Keeping the packet from becoming busywork
The honest risk with any documentation system is that it dies on the jobsite. If capturing concealed-work photos and material labels is a separate, annoying task layered on top of everything else, foremen skip it under pressure and you're back to "trust me."
The version that actually sticks is when the capture happens inside the workflow the crew is already running — photos tagged to the job as they're taken, the material manifest populated from the same delivery records the crew already handles, the jurisdiction note attached based on the job address. When the packet assembles itself from work the crew is already doing, the foreman's job shrinks to verifying rather than creating. That's the difference between a system that survives a busy August and one that quietly gets abandoned by July.
Tag photos with the permit number and shot type so the appendix assembles automatically.
You don't need anything fancy to start. A shared photo folder with a naming convention and a one-page template will beat what most crews are doing today. The tooling matters less than the gate: no call to the city until the packet is complete.
When this level of rigor is worth it — and when it isn't
A full inspector packet makes the most sense on jobs where a failed inspection is expensive or disruptive: permitted reroofs, anything in a strict jurisdiction, high-wind or fire zones with product-approval requirements, larger or complex roofs where re-inspection means a real schedule hit.
For small repair work that isn't permitted or inspected, forcing a formal packet is overhead with no payoff. The judgment call is simple: if a city inspector will decide whether you get paid and whether your crew stays on schedule, build the packet. If no one's inspecting, don't bother.
The crews that definitely shouldn't skip this are the ones scaling into multiple jurisdictions. The more towns you work in, the more inspector variation you face, and the more a standardized-but-flexible packet protects you from relearning each municipality's quirks the hard way.
The takeaway for your next permitted reroof
Most failed reroof inspections aren't about bad roofing. They're about concealed work that couldn't be re-verified, product approvals that got thrown in the dumpster, and jurisdiction quirks nobody wrote down. All three are documentation problems, and all three are fixable without reinventing anything — just a one-page packet and a foreman check keyed to how inspections actually fail.
Start with the one page. Add the concealed-work photo index and the material label habit. Build your per-jurisdiction pitfall notes over a few jobs. Then make "packet complete" the gate before anyone calls the city. The roofs were already good. Now they'll be easy to prove.
Ready to elevate your roofing operations?
Join hundreds of roofing contractors using Roofyly to streamline workflows, improve crew coordination, and enhance client satisfaction.