



Your crew finished a complex valley repair three months ago. The adjuster just rejected your $12,000 supplemental because the before photos show water damage but not the actual rotted decking you replaced. Your foreman swears he took those shots. They're somewhere in 4,700 photos spread across three phones, two tablets, and a Dropbox folder named "March jobs."
The hidden cost of photo chaos most contractors miss
Every roofing company thinks they have photo documentation figured out until they actually need to find something specific. A typical 15-person operation generates somewhere around 8,000 to 12,000 field photos monthly. Without proper roofing photo documentation standards, maybe 5% of those photos are findable when you actually need them.
The financial impact hits harder than most people realize. Denied supplementals average $8,000 to $15,000 per claim. Warranty disputes without photo evidence? Another $3,000 to $5,000 you're eating. Then there's the time drain—office staff spending two or three hours hunting through folders for inspection photos, project managers recreating shot lists because nobody documented what was captured.
What really kills profitability is the downstream effect: when field teams don't trust that their photos will be organized and findable, they stop taking comprehensive documentation. They grab the minimum shots and move on. That's when you start missing evidence that would've saved you from eating a $7,000 callback six months later.
Most contractors only discover their photo system is broken when it's already too late—during a claim dispute or warranty investigation where proper documentation would've been their entire defense.
Why standard photo apps fail for roofing operations
Consumer photo apps and basic cloud storage weren't built for construction. Google Photos might work great for vacation pictures, but it falls apart when you need to prove pre-existing hail damage patterns across 47 properties from last April's storm.
Keep every roofing job on track and on time.
Roofyly helps you manage, schedule, and communicate every roofing project with precision and ease.
- Centralized project planning
- Real-time crew notifications
- Integrated scheduling & client updates
No credit card required
The core issue is context. A photo of damaged decking means nothing without knowing which property, which section of roof, what date, what phase of work, and who took it. Standard apps strip away this context or bury it in metadata that's nearly impossible to search later.
Roofing photos need more than timestamps and GPS coordinates. You need to know if it's a pre-inspection shot, active damage documentation, repair progress, or final completion. Standard apps can't differentiate between a photo showing proper step flashing installation and one documenting improper installation that needs correction.
Then there's the physical reality of the job. Crews work on steep pitches, in direct sun, often with gloves on. They need to capture photos quickly, categorize them correctly, and keep moving. Consumer apps with tiny buttons and multi-step menus aren't designed for someone balanced on a 12/12 pitch trying to document ice dam damage before the sun drops.
The seven photo categories that matter for defensibility
After working through thousands of roofing disputes and claim rejections, clear patterns emerge around which photos actually matter. Most crews take random shots without really understanding what adjusters, inspectors, and warranty departments need to see.
Pre-inspection documentation needs to capture existing conditions comprehensively—not just damage, but proof of what wasn't damaged. Wide shots showing overall roof condition, medium shots of each roof plane, close-ups of every penetration, flashing detail, and potential problem area. These establish your baseline and protect against claims that your crew caused damage during work.
Active damage cataloging requires systematic coverage. Every damaged shingle, every soft spot in decking, every compromised flashing needs its own shot with something for scale. A tape measure, a pen, even a work boot. Adjusters reject more claims for "unclear damage extent" than almost any other reason.
Structural discovery photos during tear-off become critical for supplementals. When you uncover rotted rafters, damaged sheathing, or improper previous repairs, you need multiple angles showing both the problem and surrounding context. These shots justify change orders and additional payments.
Installation progress documentation protects against workmanship claims. Photos showing ice and water shield application, flashing details, fastener patterns, and overlap measurements prove you followed manufacturer specs. When warranties get disputed two years later, these shots are your defense.
Material verification shots seem redundant until there's a warranty claim. Photos of material labels, lot numbers, and installation dates prove you used specified products. Include shots of material storage and handling—manufacturers love denying claims based on "improper storage."
Completion photos need the same systematic approach as pre-inspection. Every angle, every detail, every transition. These aren't just for customer satisfaction—they're your proof of proper completion when callbacks show up months later.
Safety and compliance documentation often gets overlooked but matters for liability. Photos showing proper fall protection setup, debris containment, and property protection prove you followed safety protocols if incidents occur.
Building your master shot list template
Generic shot lists fail because every roof type needs different documentation. A simple gable roof might need around 35 specific shots. A complex commercial roof with multiple penetrations, equipment, and drainage systems could need 150 or more.
Start with elevation-based zones. North, South, East, West elevations each need systematic coverage. Within each elevation, break it down by roof plane—main roof, dormers, additions, transitions each get their own series.
-
One wide establishing shot showing the entire plane
-
Medium shots every 100 square feet
-
Close-ups of all penetrations within that zone
-
Detail shots of all flashing intersections
-
Ridge and edge termination points
Valley documentation needs special attention since that's where a lot of failures happen. Capture the full valley run from bottom, middle point looking up, top looking down. Then detail shots every 8 to 10 feet showing shingle overlap and flashing placement.
Penetrations need four shots minimum: approaching from downslope, from each side, and from upslope. This shows water flow patterns and flashing integration. Add close-ups of sealant application and fastener patterns.
Gutter documentation often gets missed but proves critical for water damage claims. Capture attachment points, slope verification, downspout connections, and any signs of overflow or backing up.
The key difference from generic lists: specify exact angles and distances. "Photo from 10 feet away at eye level" beats "take a wide shot." "Close-up showing 6 inches on either side of penetration" beats "detail photo."
This diagram shows the workflow from defining zones and shot types to capturing and storing photos in the field.
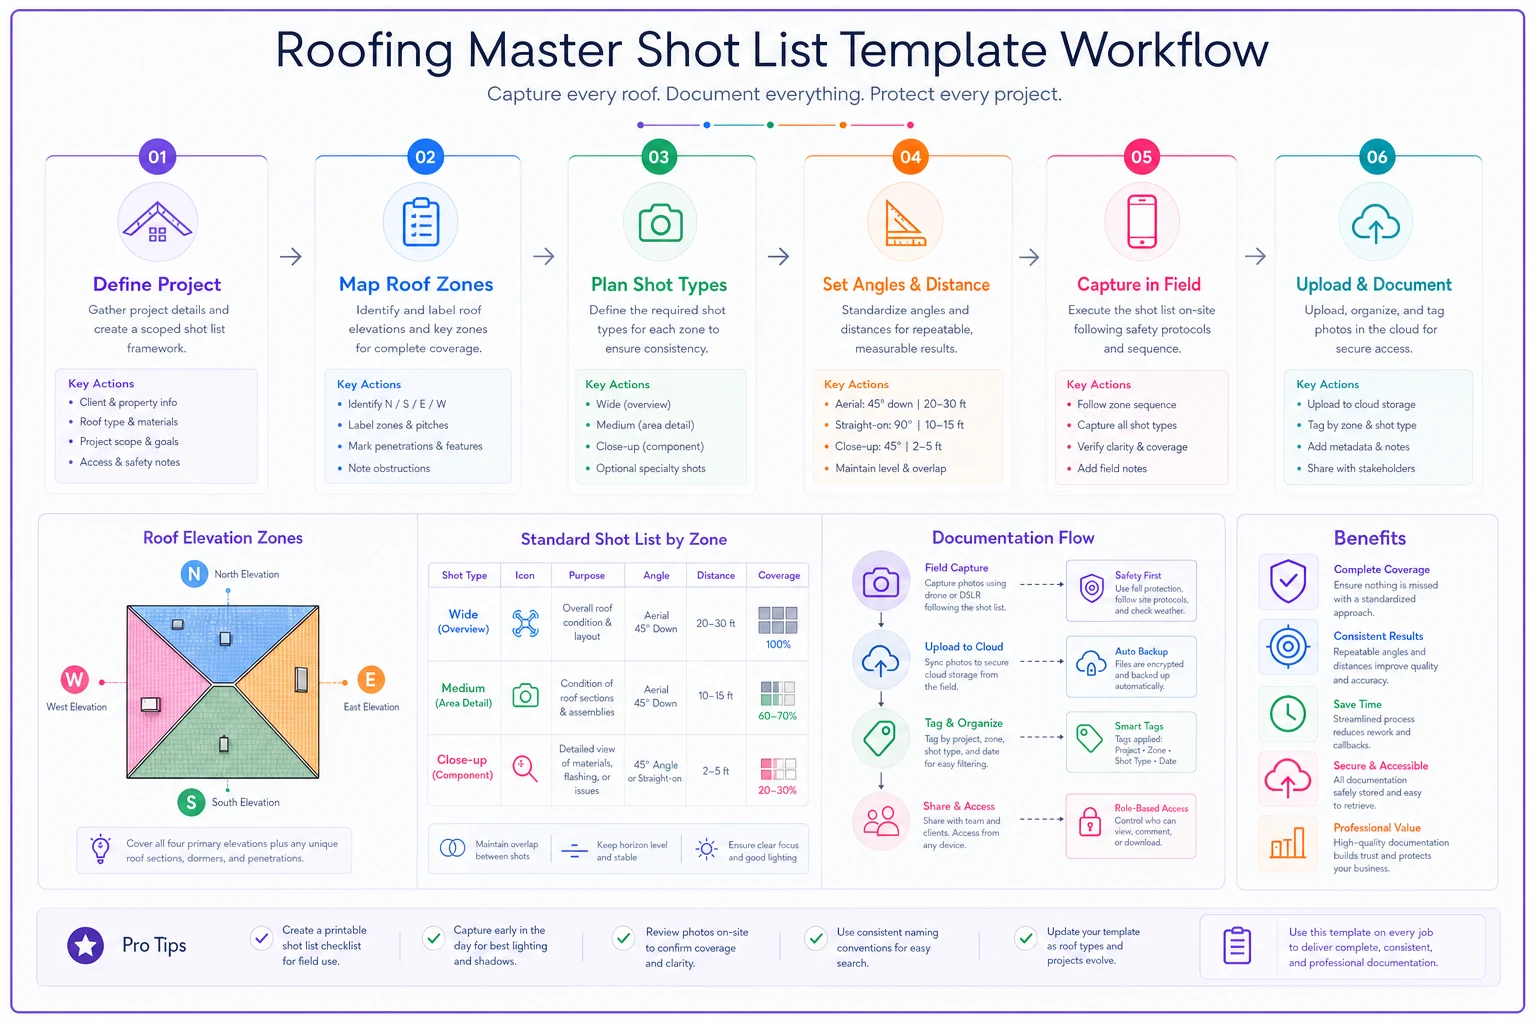
Keep the shot list practical and test it on one crew before rolling it company-wide.
Naming conventions that survive real field conditions
Most naming systems break down because they're too complex for field implementation. A foreman on a roof edge isn't going to type "SMITHJOBEASTDORMERVALLEYFLASHINGBEFOREREPAIR052824_IMG001.jpg."
The solution requires balancing searchability with simplicity. A functional naming convention uses short codes that can be entered quickly but remain searchable months later.
Property identifier comes first—street number plus first three letters of street name. "427OAK" beats trying to remember whether you filed it under Smith, Johnson (the tenant), or Riverside Properties (the owner).
Next comes the roof section using compass points and basic descriptors. "N-MAIN" for north side main roof. "E-GAR" for east-facing garage. "S-DOR2" for second dormer on south side.
Phase indicators keep chronology clear. "PREINSP," "DEMO," "PREP," "INSTALL," "FINAL." Short enough to type with gloves on, clear enough to understand months later.
| Phase Indicator |
|---|
| PREINSP |
| DEMO |
| PREP |
| INSTALL |
| FINAL |
Damage or detail types get abbreviated codes. "HAIL," "WIND," "ROT," "CRACK," "MISS" for missing shingles, "LIFT" for lifted edges, "RUST" for deterioration. These become searchable keywords.
Your final format looks like: 427OAKN-MAINPREINSPHAIL001
Seems simple, but watch what happens at scale. You can instantly pull all hail damage across all jobs. All pre-inspection photos from the Oak Street job. Every north-facing main roof issue from the past year. The structure creates natural organization without complex folder hierarchies.
Metadata that adjusters actually care about
Photo metadata usually gets ignored until you're in a claim dispute. Then suddenly everyone wants exact timestamps, GPS coordinates, and device information. Standard metadata capture isn't enough—you need additional context that proves your case.
Weather conditions at time of photo matter more than most realize. A photo showing minimal granule loss taken in bright direct sunlight looks different than the same roof photographed on an overcast day. Note lighting conditions, especially for damage assessment photos.
Device calibration becomes important for measurement photos. When you're using a photo to show that a damaged area exceeds 25% of a roof plane, adjusters want to know your measurement methodology. Document what you're using for scale references.
Personnel attribution protects against disputes. When a homeowner claims your crew caused damage, knowing who took each photo and when helps establish timeline. Skip complex login systems—a simple initial code works better.
Equipment and material visibility in frame adds credibility. A photo showing damaged decking hits different when there's a moisture meter reading visible in the shot.
Chain of custody matters for legal defensibility. If photos move from phone to tablet to computer to cloud storage, that journey needs tracking. Automated systems handle this better than manual processes, but even basic documentation helps.
The trick is capturing this metadata without disrupting field workflow. Pre-configured templates where crews just tap options work better than free-form text entry.
Setting up automated tagging rules that work
Manual tagging fails around 50 photos. By 500, it's impossible. By 5,000, nobody even tries. But without tags, your photos become unsearchable regardless of how well they're named.
AI-powered tagging seems like an obvious fix, but generic AI doesn't understand roofing context. It might tag a photo as "roof" and "shingles" but miss that it's specifically showing improper step flashing that could void a warranty.
The solution combines automated detection with roofing-specific rules. First, establish your core tag categories: damage types, materials, roof sections, work phases, and compliance indicators.
Basic automation handles the obvious stuff. GPS coordinates automatically tag which job site. Timestamps combined with crew schedules tag which phase of work. Phone identifiers tag which crew member.
Pattern recognition takes you further. Photos taken in sequence at the same location get grouped automatically. Shots taken from ground level versus roof level get different tags. Photos with measurement tools visible get tagged for supplemental documentation.
The key is building rules that match your workflow. If crews always photograph damage before starting repairs, photos from the first 30 minutes on site automatically get tagged as "pre-work condition." If final photos always happen between 3–5pm, that timing triggers "completion" tags.
Don't over-automate, though. Some tags need human verification. "Structural damage" versus "cosmetic damage" might determine insurance coverage. "Correct installation" versus "needs correction" affects warranty validity. These calls need quick human review, but automation can flag them for attention.
Your tagging system should answer the questions that come up months later. "Show me all photos of valley work from last March." "Find every photo showing granule loss we've documented." "Pull all pre-work photos from jobs where we found hidden damage."
Mobile optimization for gloved hands and bright sun
Construction workers often can't use their phones normally on job sites. Roofing creates particularly hostile conditions. Bright sun makes screens unreadable. Thick work gloves make precise tapping impossible. Steep angles mean one hand is usually gripping something for stability.
Standard photo app interfaces completely break down in these conditions. Tiny buttons, multiple confirmation screens, complex menus—none of this works when you're documenting ice damming while balanced on a ladder in February.
Effective mobile design for roofing starts with massive tap targets. Buttons need to be noticeably larger than what consumer apps use. The most common actions—take photo, tag damage type, mark location—should require single taps on targets you could hit wearing mittens.
Screen brightness alone isn't enough for outdoor visibility. High contrast interfaces with pure black text on white backgrounds beat fancy gradients and subtle colors. Avoid gray text, thin fonts, or anything that requires squinting.
Batch tagging during breaks speeds workflow and reduces on-roof time.
Voice input seems like an obvious solution but fails in practice. Wind noise, equipment running, multiple crews talking—job sites are too loud for reliable voice recognition. Plus nobody wants to be shouting "DOCUMENT GRANULE LOSS ON NORTH DORMER" across a neighborhood.
The workflow needs to minimize screen time. Batch operations beat individual processing. Let crews rapid-fire capture everything, then batch tag during breaks. Quick-select templates for common scenarios speed things up: "Hail damage series," "Flashing detail set," "Complete installation package."
Offline capability isn't optional. Rooftop connectivity is spotty, and waiting for uploads breaks workflow. Queue everything locally, sync when convenient. But include clear indicators showing sync status, automatic retry on failures, and alerts for any photos that haven't uploaded within 24 hours.
Creating your claims-ready documentation package
Insurance adjusters and supplements processors see thousands of claims monthly. The ones that get approved quickly share common traits: clear organization, comprehensive coverage, and easy navigation. Your photo package needs to tell a story they can follow without explanation.
Structure your package in phases that match the adjuster's review process. Start with establishment shots—wide views showing the entire property, each elevation, overall roof condition. These orient the reviewer before diving into specifics.
Next comes your damage inventory. Group by damage type rather than roof section. All hail damage together, all wind damage together, all wear-related issues together. Within each category, progress from most severe to least severe.
Include comparison context. A photo showing hail damage means more when the next photo shows an undamaged section for reference. A shot of lifted shingles has more impact next to a properly adhered section.
Support photos often get overlooked but matter for approval. Weather reports showing storm dates. Photos of neighboring properties with similar damage. Test square markings showing hit density. Even photos of your measurement methodology—these details build credibility.
Your summary sheet makes or breaks the package. One page, visual index of all documentation. Small thumbnails organized by category with photo counts. Brief labels, not long descriptions. Page numbers or digital links to full-size versions. Think of it as a visual table of contents an adjuster can scan in 30 seconds.
The digital format matters more than most realize. PDFs beat loose image files. Consistent page orientation. Reasonable file sizes—under 25MB total, ideally under 10MB. High enough resolution to zoom but not so high it crashes older devices. Include both a full package and a highlights version under 5MB for quick review.
The AI automation advantage for photo workflows
Manual photo organization hits a wall around 1,000 images—nobody can maintain consistent naming, tagging, and filing at that scale. AI-powered operational software handles 10,000 photos as easily as 100, and the difference isn't just volume.
These systems can analyze photos for context humans might miss. They detect patterns across jobs—like noticing that valley failures increase significantly on homes with certain architectural features. They flag anomalies, like when damage patterns don't match reported storm paths.
Automated workflows eliminate the gaps where documentation breaks down. When a crew uploads photos, the system immediately verifies minimum documentation requirements were met. Missing a crucial angle? Get an alert while still on site. Forgot to photograph the material labels? Flagged before leaving the job.
Search capabilities change everything. Instead of hunting through folders, you search naturally: "Show me all chimney flashing photos from jobs where we found hidden damage." The system understands roofing terminology, damage types, and construction phases.
Quality control happens automatically. Blurry photos get flagged for retake. Duplicate shots get identified and archived. Photos without proper context get queued for additional tagging. The system learns your company's specific documentation standards and enforces them consistently.
During disputes, the value becomes obvious. When an adjuster questions your supplemental, you can instantly pull every relevant photo, organized chronologically, with full metadata intact. When a warranty claim arrives two years later, you have immediate access to installation photos proving compliance.
This isn't about replacing human judgment—it's about handling the tedious organizational work so your team can focus on roofing.
Beyond basic documentation: building your visual database
After six months of proper photo documentation, something shifts. You stop just defending against claims and start identifying patterns that improve operations. Those thousands of organized, tagged photos become a searchable database of roofing intelligence.
Patterns emerge that you'd never notice from individual jobs. Maybe valley failures concentrate in specific neighborhoods with similar builders. Certain shingle brands show premature wear under particular conditions. You start seeing which installation methods actually prevent callbacks versus which ones just look good on completion day.
This visual database becomes a training goldmine. New crews can see exactly what proper flashing looks like, what counts as significant hail damage, how to identify rotted decking. Real photos from your actual jobs beat generic training materials every time.
Estimating gets more accurate too. Instead of guessing whether that 1960s ranch likely has multiple layers, you can check similar homes you've documented. You know which neighborhoods tend to have solid decking versus those needing extensive replacement.
Customer education improves. Show homeowners actual before-and-after photos from similar projects. Help them understand why their estimate includes contingencies by showing what you've found under similar roofs. Real documentation from your own portfolio builds more trust than any sales pitch.
The compound effect kicks in after about a year. Documentation quality improves because crews can see what good documentation looks like. Supplements get approved faster because adjusters recognize your thorough approach. Callbacks drop because you catch more issues during initial inspection.
Making it stick: the 30-day implementation plan
Rolling out new photo documentation standards fails when companies try changing everything at once. Crews have established habits. Office staff have existing workflows. Massive overnight changes create resistance.
Week one focuses solely on basic shot lists. Pick three critical photo types—pre-inspection, damage documentation, and completion. Create simple laminated cards showing exactly what angles to capture. No naming conventions yet, no complex tagging. Just consistent shots.
Week two adds basic naming. Use the simplified format covered earlier, but only for those three photo types. Let everything else stay in the old system temporarily. This prevents overwhelming crews while building the new habit.
Week three introduces automated tagging for job site and date. Don't try complex categorization yet. Just ensure every photo gets automatically linked to the correct property and date. This alone solves the majority of photo retrieval problems.
Week four brings in damage categorization. Train crews on the five or six main damage tags that matter most for your operation—hail, wind, wear, structural, whatever you deal with most. Keep it simple enough to remember without reference cards.
By month two, you can add remaining documentation types and tags. The foundation is established, crews understand the value, and resistance has faded.
Monitor adoption through simple metrics. What percentage of jobs have complete documentation? How many photos get properly tagged? Don't aim for perfection—80% compliance beats an abandoned system that demanded 100%.
The key to making standards stick is showing immediate value. When a foreman can pull up last week's photos in seconds instead of hunting for 20 minutes, they become believers. When your office manager approves a supplemental using organized documentation, they champion the system.
Why most roofing companies won't do this (and why that's your opportunity)
Most roofing contractors know they need better photo documentation but won't implement it. They'll read articles, buy apps, make plans—then six months later, they're still dumping random photos into desktop folders named "June roofs."
The resistance isn't laziness. Proper documentation feels like overhead when you're fighting to keep crews busy and cash flowing. Taking organized photos doesn't immediately generate revenue. Training crews on naming conventions doesn't win more bids. It feels like bureaucracy in an industry that runs on speed and hustle.
This creates real opportunity for companies willing to build these systems. When everyone else scrambles to find photos for supplements, you submit organized packages in hours. While competitors eat warranty claims they can't defend, you have documentation proving proper installation. When legal issues arise, you have timestamped, GPS-verified evidence while others have chaos.
The advantage compounds over time. Better documentation leads to faster insurance approvals, which improves cash flow, which lets you take on more complex projects, which builds reputation, which attracts better contracts. Meanwhile, competitors still searching through unnamed photos fall further behind.
The contractors who'll dominate the next five years aren't necessarily the ones with the most crews or biggest marketing budgets. They're the ones building operational systems that scale. Proper roofing photo documentation standards might seem like a small detail, but it's exactly the kind of foundational system that separates professional operations from guys with trucks and ladders.
Your photos are evidence, intelligence, and insurance rolled into one. The question isn't whether you need documentation standards—it's whether you'll build them before your competition figures out the advantage you're handing them.
Your photos are evidence, intelligence, and insurance rolled into one. The question isn't whether you need documentation standards—it's whether you'll build them before your competition figures out the advantage you're handing them.
Ready to elevate your roofing operations?
Join hundreds of roofing contractors using Roofyly to streamline workflows, improve crew coordination, and enhance client satisfaction.